Designed
by |
 Easy Maintenance Worm Bins By Kazuko (Kay) Smith Indoor worm bin If you live in a city with limited space or you don’t have time to make a compost pile, you can still enjoy making fabulous vermicompost in containers. By raising earthworms in containers, you can easily bring your worms indoors to protect them from winter cold and you’re also in control of the growing conditions. Once your worms have started reproducing, you will have worms for fishing whenever you want and the added benefit of raising your own worms in containers is that the worms turn your kitchen wastes into clean fertilizers for your house plants, flowers, lawns, shrubs, trees, etc. Worms The best kind of earthworm to use in the container is the redworm, red wiggler or manure worm. The redworms (Eisenia foetida, Eisenia andrei or Lumbricus rubellus) prefer an environment with more organic matter than soil and they can tolerate heat well enough to live in a worm bin. A general rule of thumb suggests that if you generate 1 pound of kitchen wastes per day, you will need ˝ to 1 pound of worms (about 500 to 1,000 worms) per square feet of surface area. The container While there are numerous ready-made worm bins on the market, use your imagination and recycle something like an old deep laundry sink, metal wash tub, dresser drawer, wheel barrow, garbage can, 10 to 15 gallon flower pot, wood box, 4 to 5 gallon plastic bucket with lid, etc. Avoid containers that have been exposed to pesticides or other toxins.
For best results, we recommend the beginner use two (10 to 18 gallons size container) containers to process one week worth of kitchen wastes. Dividing each bin into four regions and adding wastes in a circular pattern will give the worms time to finish off each section. The time factor is important because you can turn the bin’s content sour and the worms may die from heat/anaerobic conditions. Location of your worm bin Your worm bin can be located in a number of places: patios, sheds, basements, or garages. Always keep the worm bin in a shady place where temperatures stay above 45 degrees F and below 85 degrees F. If you want to leave the container outside the house, be sure to cover the container with an aerated lid. Keep the container in a shady location where it will not freeze or overheat and be sure to protect it from the rain. In regions that freeze during winter, be sure to keep your worm bin indoors to protect your worms from freezing temperatures. Bedding material Your start-up bedding mix can be made from Canadian peat moss, shredded papers, cardboard, fallen leaves, hay, straw etc. Mixing more than one bedding material in the bin is always recommended and the contents should be kept at a pH level around 6.5 to 7. This is the optimum pH level for worms.
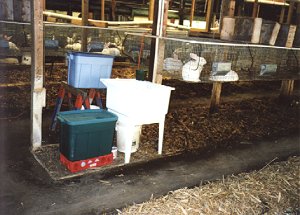
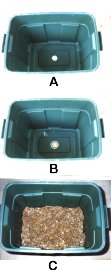
Bedding made of Canadian peat moss mixed with shredded newspaper or strips on a one-to-one ratio will not compact, holds moisture and contains air spaces essential to worms. Mix dry materials together first then gradually add water, toss and mix until the bedding material soaks up the moisture. Good bedding conditions are obtained when the material is about as damp as a moistened sponge.Feeding your worms Redworms are very active, digesting raw organic material and producing their weight in castings (earthworm manure) every day. They will eat just about any type of kitchen waste including fruits and vegetables, bread, coffee grounds and filters, tea bags and eggshells. Meats, fats, cooking oils, salt and vinegar should not be included. Kitchen scraps should be finely chopped (worms do not have teeth to tear off large chunks - run the food through a blender or food processor) before feeding to the worms. The kitchen waste should be buried in the bedding to avoid unwanted pests such as fruit flies. For best results, loosely cover the freshly added food with a Ľ to ˝ inch layer of lightly moistened, shredded newspaper. This will encourage the worms to move up to the surface to feed and mate. Worm bin set up Redworms require a moist, dark, warm, well-drained and well-aerated environment. Earthworms and microorganisms need air for decomposition. Without drainage holes, the bedding material becomes waterlogged and this may kill the worms. The following examples show you how to put together your first worm bin. A) Deep laundry sink (Quick and easy set up - my favorite worm bin) There are many practical ways of setting up worm bins, but for convenience, I have found that deep laundry sinks with a four (4) legged stand is excellent for indoor worm bins and can be found at most hardware stores. To provide excellent drainage and prevent worms from crawling out of the drain hole, I use small circular stainless steel fine screen drainpipe net (PipeNetsJ ) to cover the drainage hole. To order this screen drainpipe net, please visit our Order Form page. small size drainpipe net into the drainage hole. (By the way, large drainpipe net work great in your kitchen sink for catching scraps that you can place into your bins.) Place a bucket under the deep sink drainage hole to collect the excess liquid (worm tea) which can be used as a good liquid organic plant fertilizer. Fill the sink with 5 to 6 inches of moist bedding material and add two handfuls of garden soil (which introduces beneficial microorganisms). Also, give the worms grits to aid in their digestive system. Mix well. Release your redworms on top of the moistened bedding. They will disappear immediately. Add small quantities of kitchen scraps. (Read section on feeding your worms and maintenance). Cover top with 4 to 5 pages of moistened newspaper (wet with spray bottle) or loosely cover with Ľ to ˝ inch thick layer of damp shredded newspapers. A cover is not necessary, if you keep the deep laundry sink indoors and let a light shine over the deep laundry sink all the time (fluorescent or 40-watt bulb works fine). If you have fruit flies problem or still worry about raising earthworms without cover, use a screen window insert or cut out a cardboard box (be sure to punch small holes for aeration) to fit the top area. B) Rubbermaid™ storage container (Traditional indoor vermi-composter) Model #2214 (10 gallons) and #2215 (18 gallon size) are excellent containers for vermicomposting and can be found at most discount department stores. Make sure the container is clean by rinsing it with tap water to remove any residues which may be harmful to the worms.
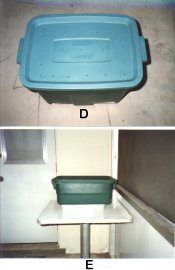
C) Trashcan (Outdoor vermicomposting) A garbage can (20 to 32 gallons) may serve as an outdoor worm bin. Drill holes (no bigger than 1/4 inch diameter) 5 to 6 inches apart in the lid, side and bottom of the can. Place the can on bricks or cement blocks to ensure aeration and drainage. Put 5 to 6 inches of moist bedding material in the bottom of bin and release the worms. Add some food and cover material with a thin layer of moistened, shredded paper, dry grass clipping, fallen leaves etc. Trash cans with a clasp-on lid work best. A plastic garbage can will last longer than a metal one because it won't rust, but use a metal garbage can if you have a rodent problem. Use a bungee cord to hold the lid on securely to prevent animals from getting into your vermicompost. (I have learned the hard way already.) Outdoor worm bins should be kept out of the sun and rain. When temperatures drop below 50 degrees F, worm bins should be moved indoors. D) 4 to 5 gallon plastic bucket with lid (Indoor or outdoor worm bin) This is great for a child’s small worm project. Keep adding more buckets as needed.
Maintenance The live worms require adequate moisture, food and good bedding conditions for growth and survival. It takes a little practice to familiarize yourself with how much waste the worms can process. When adding kitchen scraps to the bin, lift up the newspapers then pull aside some of the bedding and bury the food. Give them a few days to feed, then check bedding conditions. When the food is almost gone, you can feed them again. For best results, drain kitchen wastes before adding to the bin then bury the food in a different spot of the bin each time. Occasionally, sprinkle dolomite lime in small quantities to prevent acidity. Common problems and solutions Most container-grown worms that do not thrive are usually living in a poor habitat due to faulty feeding practices, usually overfeeding. For healthy worm bins, you must keep adding both green and brown organic matter. If you only put vegetable scraps in your worm bin, bedding conditions may become too wet and microorganisms will get overloaded with nitrogen, causing a distinctive odor. To have clean-smelling vermicompost and to cut down on excess moisture, add a thin layer (about Ľ inch) of shredded newspaper, sawdust, wood shavings, leaves, or peat moss, etc., to cover up the food. Adding the brown organic matter (dry organic matter) cuts the odor and makes kitchen scraps decompose faster. If your worm bin’s temperature is too hot, remove some kitchen scraps from your bedding or push bedding material to one side and replace the empty sections with dampened, shredded newspaper. The worms will escape from the hot areas and can keep cool in these areas while the other half undergoes microbial decomposition. When the other half cools down, mix every thing together and add small quantities of kitchen scraps again. If your worm bin smells rotten, fluff up the bedding material with your hand and work in some dry material (Canadian pet moss work best). As you turn the material in, there will be a restoration of the ideal level of dampness. Hand mixing helps introduce new air into the material. Never pack down the material. Harvesting your worm castings Worms kept in their old bedding material (worm castings) for too long will get smaller and smaller. They will eventually die of starvation. When worm bins almost become full, remove the worm castings carefully and add fresh bedding material. Used up (old) black bedding material is composed of worm castings and they are Nature's finest source of plant food and soil conditioners. It promotes rapid plant growth without burning, stimulating the growth of all plants when placed or mixed into the soil around the root system. We use our worm castings extensively in our gardens and plants with great results. During the week you are planning to harvest the worm castings, don't put any vegetable scraps in the bin, but sprinkle a thin layer of dry food such as corn meal, bread crumbs, grits, flour etc. When the earthworms come up to the top to feed, carefully remove the top 4 to 5 inches of bedding material which has fresh and partially decomposing food stuffs, most of the worms and their cocoons. Keep them in a holding container, such as a small wash tub or plastic bucket, while you harvest the worm castings. A method commonly used by earthworm farmers is known as "table harvesting". A sheet of plywood covered with plastic wrapping (lawn trash bags) will serve this purpose. Dump the remaining old bedding material on top of the harvesting table. In a well-lit area, the worms attempt to bury themselves as deeply as possible to avoid exposure. Start removing the top layer of the castings with your hands. Wait a few minutes for the worms to burrow down again, and repeat the process. Eventually all of the bedding has been removed off the pile and a solid mass of worms will remain. Quickly gather the worms and place them in a holding container. Rinse out the bin, stainless steel drainpipe net, bottom tray or bucket and reassemble. Add 2 to 3 inches new bedding material, then put the worms in the holding container along with the top layer of old bedding material back into the worm bin. Add small amounts of kitchen waste then cover it with moistened shredded paper. The cycle is now completed and will continue as long as you maintain your bins. Top of Page | Order Form | Home Page K & W RABBIT AND WORM FARM P.O.Box 50691 Fort Myers, FL. 33994 Tel/Fax (941) 543-2620 e-mail: kwfarm@msn.com
|
||||